Description
Note: On Midmark M9D Autoclaves, approximately 650 ml of water will enter chamber before reaching the water sensor.

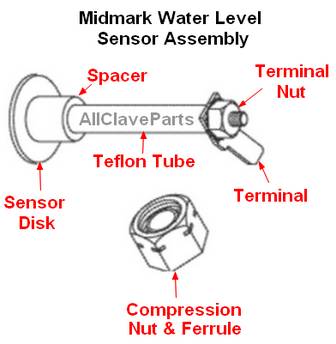
M9D Water Level Sensor Asssembly
MIS075-7373
Midmark Part #002-0358-00
The Water Level Sensor Tells The Autoclave's PC Board When There Is Enough Water In The Chamber To Start The Cycle
Assembly Includes
- Sensor Disk
- Spacer
- Teflon Tube
- Compression Nut with Ferrule
- Terminal Nut
- Terminal
Fits: Chamber
Model This Part Fits: Midmark M9D Autoclaves
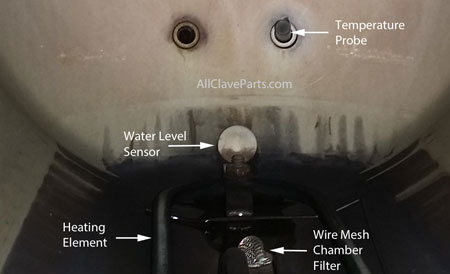
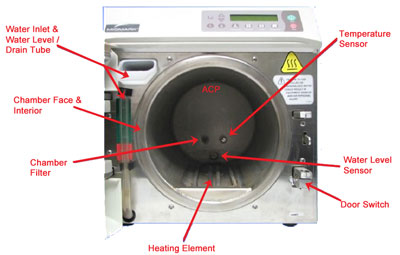
Here is where to Find The Water Level Sensor
The Water Level Sensor is Located Inside The Midmark M9D Autoclave Chamber
Click on Image For Larger Picture
How To Replace The Midmark M9D Autoclave Water Level Sensor Assembly
Start By Removing The Old Autoclave Water Level Sensor Assembly:
- Disconnect wire from Sensor by pulling if off of the Terminal
- Using a wrench, remove Terminal Nut, Terminal & Compression Nut
- From inside the chamber, remove Sensor, Spacer & Teflon Tube
Next Install The New Midmark M9D Autoclave Water Level Sensor Assembly:
- Install Teflon Tube & Spacer onto Sensor
- Install Sensor thru hole in chamber
- Install Compression Nut and then install Terminal & Terminal Nut
Caution: DO NOT Over-Tighten Compression Nut (Tighten Only 1¼ turns past finger-tight)
- Perform continuity test to make sure assembly is not grounded (it should not be continuous)
- Connect Sensor wire to Terminal
Midmark Water Level Installation Tip
- Unplug the unit from the wall before proceeding
- Make sure the unit is level in all directions (front to back and side to side)
- Remove the exisiting water level sensor
- Insert the new water level sensor into the hole inside of the chamber, make sure the spacer seats in the hole
- Install the compression nut and hand tighten only (leave it loose enough you can still manipulate the sensor)into position
- Pour distilled water directly into the chamber until it reaches the front dam
- Move the sensor disk until it just touches the water
- Tighten the compression nut 1-1/4 turns past finger tight
- Install the terminal and terminal nut onto the Teflon tube
- Reconnect the sensor wire
If it is installed correctly, you should be able to start a cycle. It should go directly to the heat up mode (the water is touching the sensor.... completeing the circuit and telling the PC Board that there is sufficient water to proceed)
"Midmark M9D Autoclave Repair Made Simple"


