Unplug the unit before proceeding
How To Remove & Replace Tuttnauer 3870 Series Heating Elements
Removing The Tuttnauer 3870 Series Heating Element
- To remove the heating element, first loosen the bolts that connect the two ends of the element
together until the heating element can be rotated easily.
- Rotate the element to gain easy access to the wires. Then remove the wires
Tech Tip: When removing (or installing) the heating element wires, always hold the
terminal on the element with a pair of pliers while turning the screw. If the terminal itself
is allowed to turn, then there is a danger that the internal connection to the element will be
broken, rendering the heating element useless.
- Finish removing the bolts
- With the wires and the bolts removed, rotate the elements until the tabs of the elements pass
below the reservoir and tubing. At this point the elements will easily come away from the
Chamber.

Installing The New Tuttnauer 3870 Series Heating Element

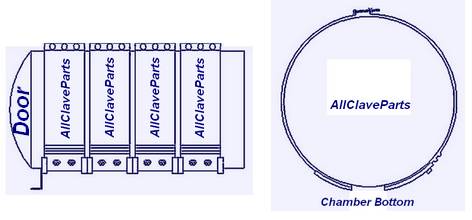
When installing the elements the rear most element goes on first, and is positioned as far back on the
Chamber as possible. The remaining elements are installed butted up to the element before it. There should
be no spaces between the heat pads of the elements.
It is normal for new elements to
smoke and smell slightly the first and second time the autoclave is run.
- Connect the Heating Element Wires to the new heating element. Insure that the wire terminal is tight
- Align the Heating Elements so they are centered properly on the bottom of the chamber.
Starting with the rear most element, tighten the element loosely. Visually center the heating pad
with the bottom of the Chamber
Note: The bolts at the top of the element and the weld seam at the top of the
Chamber can not be used for proper centering.
- Once the rear element is centered, tighten it down and then align the edge of the next heating pad to
the first, tighten it down and continue to move forward.
If the elements are skewed up on the side of Chamber this will cause the elements to work harder
trying to drive the heat down to the bottom of the Chamber where the water is. The elements will
always try to drive the heat to the bottom of the Chamber where the water is.
Skewing the elements up on the side of the Chamber will result in the elements
constantly overheating and shortening their life span.
Tightening the Heating Elements
The key to properly tightening the heating elements is to watch the tabs at the top of the elements.
As long as they remain straight, then tightening the bolts will result in tightening the element.
When the only the tops of tabs are moving toward each other then you're not tightening the elements
any more, you're only deforming the tabs.
When tightening the elements it is important to make them tight. If the elements are not tightened
properly then an air gap will develop between the heating pad and the Chamber. This gap will cause
the element to work harder to drive the heat across the air gap into the Chamber.
This will result in the element constantly over heating and shortening its life span
Instructions For Removing & Installing The Tuttnauer 3870 Series Heating Elements Brought To You By AllClaveParts.com


