How To Replace The Bottom Heating Element On The Pelton Crane OCM & OCR Autoclaves
WARNING: BEFORE STARTING THIS PROCEDURE, UNPLUG THE AUTOCLAVE FROM THE OUTLET AND LEAVE IT UNPLUGGED UNTIL THE ENTIRE PROCEDURE HAS BEEN COMPLETED
The first thing we want to do is to make a point of reference for the heating element & bracket assembly....to help us to relocate the assembly when we are putting it back together.
- Take a pencil and mark the location of the side heating element as shown in red in the picture below
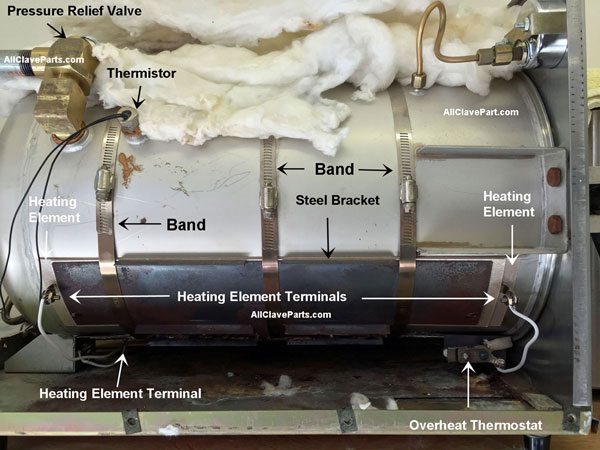
- Unscrew the (3) bands with a flat blade (standard) screwdriver by turning each screw where indicated in a counterclockwise (left) direction. Unscrew them completely until the bands come apart. Do the two outside ones first, and the middle band last
- When the bands are all undone, the steel bracket assembly along with the heating elements will fall onto the floor of the autoclave
- It is not necessary to remove the bands from the bracket, just leave them where they are
- Now grab the steel bracket and pull the complete assembly towards you. You will not be able to pull it out very far because of the wires that are connected to everything, but you can pull it out far enough so that you have access to the center (bottom) heating element (and yes, all 3 heating elements will come down with it...but just leave the side elements where they are..Do Not Remove them from the steel bracket, nor remove the wires going to them)

If the existing element is in a steel jacket like the picture below, all you have to do at this point is to disconnect the wiring from the heating element you are replacing by removing the screws on the terminals, then lift out the heating element and throw it a away, putting the new one in it's place
If you have the original fiber element (it may be broken and/or cracked), disconnect the wires going to it and lift it out and throw it away. Under the fiber element there will be a copper place, in the shape of the new element you will be installing. It won't look like copper. It will most likely be black and could even be burned in spots. Lift it out and throw it away as well.
Take the old wire you removed from the original heating element and measure it. Then cut the new wire to the same length (the wire should not be tight, and needs to be loose enough that it almost touches the chamber floor when in place)
When installing the new element, the curved side goes towards the chamber. The other side will have the terminals for the new wires and faces towards the steel bracket (down).
Before reconnecting the wires, remove the overheat thermostat. There is a screw going through the thermostat with a nut on the other side. You can hold the nut with pliers as you turn the screwdriver to remove the screw.
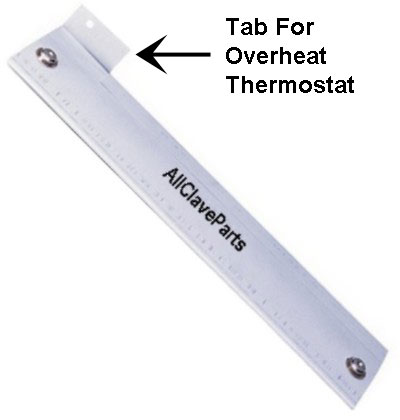
Notice the tab on the new heating element as shown in the picture below. Bend the down...you can bend it with just your fingers. This tab is what you will mount the overheat thermostat to after you have the heating elements in place

Okay, we are ready to put it back together now.
Take the wires that went to the old heating element and connect them to the new element. Place the heating element curved side up as stated above into the steel bracket in place of the one you removed. Make sure you have removed the copper plate if the one you are replacing is fiber. When assembled, it should be the steel bracket, then the heating element and then the chamber
Now here is where you may need some help. You will want someone to hold the whole steel bracket & heating element assembly against the chamber as you place the bands around the chamber and tighten the screws to hold it in place. Start with the middle band, and make sure it fits in the bracket the way they were when you took them off (as shown in the 1st picture above).
Leave the bands somewhat loose so you can manipulate the assembly and get everything lined up properly. Before proceeding, make sure all of the wires are on the outside of the steel bracket. The wire from the center element should be just hanging down) Then make sure the terminals on the new heating element are not touching the steel bracket (if the terminals touch the steel bracket, it will create a short in the system)
Once the bands are in place (but still somewhat loose), grab the middle of the steel bracket and pull it up until the side heating element lines up with the pencil marks you made on the chamber. Then, while someone is still holding the assembly against the chamber, begin to tighten the screws on the bands. Check the alignment as you go, making sure the side elements have all stayed in place. Now tighten the bands until they are snug, check your alignment with the pencil mark as you go to make sure everything has stayed in place.
Tighten all screws sequentially, starting at either end, turn each one until they are tight, and then turn the screw another turn. If you want to be accurate on the 40 pounds of torque, you can buy a "torque wrench" to complete the procedure
Once everything is in place and tight, now reinstall the overheat thermostat to the tab you bent down on the new heating element. Push the screw you removed through the hole n the thermostat and through the tab on the heating element. You can hold the nut with your fingers while you turn the screw with the screwdriver. Make sure it is tight and that the overheat thermostat is not touching the chamber (or anything else for that matter)
Make sure the 3 bands are still good and tight
You are now ready to test it. Leaver the cover off for now, plug the unit back into the outlet and then start a cycle as you normally do. The heating element has a thin coat on it, that will cause it to smoke and will give off a "burnt" odor. This is normal and will only last a few minutes or so. Tighten the bands once more after the unit has cooled down.
Try one more cycle
If everything is good, put the cabinet back on and put it back to work