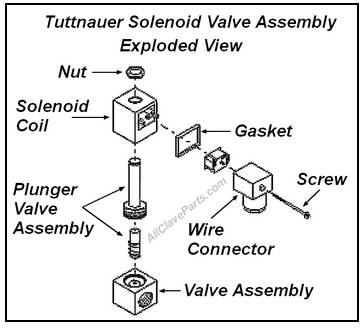
Note: There are two size Plungers: a 3mm and a 6mm. Typically, the
Plunger Housings are marked on the end with a blue dot for 3mm
and a green dot for 6mm
If however the markings are not apparent, then measuring the seat
once the Plunger is removed will make clear which one is the
proper replacement
How To Replace The Tuttnauer Valve Plunger
(On The Solenoid Valve Assembly)
(2) Tools Are Required For This Procedure: a 3/4" Wrench & a 7/8" Wrench
- Unplug the unit from the wall outlet
- Remove the Outer Cabinet
- If replacing the Fill Valve make sure the Reservoir and Chamber are empty of any water
If replacing the Exhaust Valve make sure the Chamber is empty of any water
If replacing the Dry Pump Valve make sure the Chamber is empty of any water
- Remove the Solenoid Coil by using a 3/4 inch wrench to loosen the retaining nut
- Remove the Plunger Assembly using a 7/8 inch wrench. NEVER use Vise Grips on the sleeve of the Plunger Assembly, doing so can damage
the sleeve and cause the Plunger not to function
- Clean any dirt or debris from the valve base
- Using compressed air blow out both the incoming and outgoing passage ways in the base
- Inspect the valve base for damage
Check the area where the Plunger seats for nicks or gouges that may cause leaking
If any damage is found the base should be replaced
- Install the new Plunger Assembly and tighten down with a 7/8 inch wrench
- The Plungers do not require any lubrication

Tuttnauer Autoclave Repair Made Simple ™