This Troubleshooting Guide is applicable for the following Midmark Autoclave Model Numbers: M9-020 thru -022, M9D-020 thru -022, M11-020 thru -022, M11D-020 thru -022
How To Test the Midmark Temperature Sensor
Service Tip: Residue can build up on the Temperature Sensor Probe causing inaccurate temperature readings. Clean the probe with an
abrasive pad (dark color scotch-brite pad). Then try another cycle. If the autoclave still does not work properly, move on to the testing as follows
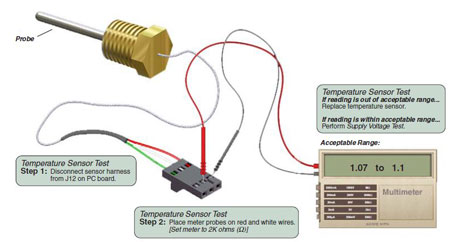
Temperature Sensor Test
Step 1: Disconnect temperature sensor harness from J12 on PC board.
Step 2: Place meter probes on red and white wires. [Set meter to 2K ohms Ω]
Acceptable Range is 1.07 to 1.1 ohms Ω

If reading is out of acceptable range...Replace the Temperature Sensor
If reading is within acceptable range...Perform Supply Voltage Test
Temperature Sensor Supply Voltage Test
First, locate the Test Points TP2 & TP4 on your PC Board. Set your meter to 20 VDC
Step 1: Place meter probes on test points:
Black probe: TP2
Red probe: TP4
Acceptable Range is 4.0 to 6.0 VDC
If reading is out of acceptable range...Replace main PC board.
If reading is within acceptable range...Main PC board is functioning properly


