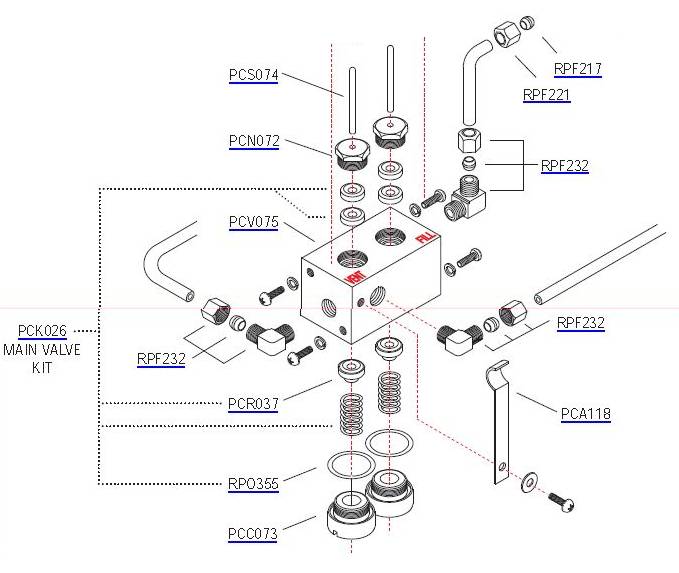
The Pelton Crane Main Valve Assembly contains 2 valves...... which regulates the flow of water to and from the chamber.
The fill valve opens during the fill cycle allowing water to enter into the chamber from the water reservoir in preparation for the Sterilization Cycle.
Once the unit is advanced to the "Sterilize" cycle, the fill valve is closed
The Vent Valve opens during the "Vent Cycle". When this valve opens, all pressure and steam from inside the chamber is sent back to the
condensation coil located inside the water. The Condensation coil allows the steam to cool and return to it's water state before venting it
back into the water reservoir

How To Check If The Main Valve Is Leaking
Run the machine as normal, until the pressure reaches between 20-25 lbs. Unplug the power cord.
DO NOT turn the control knob on the front of the machine.
Pull on the safety release valve ring and release the steam pressure. Immediately open the door and look to see
how much water is in the chamber.
If the chamber is bone dry then the machine is blowing the steam back through the fill side of the main valve. This
indicates that the valve is not sealing and the components inside the valve need to be replaced.
Replacing the components is easy and very simple using the Main Valve Repair Kits AllClaveParts offers (you will need to order (2) kits
How To Clean Main Valve Or Replace Button Retainer
- Unplug Autoclave And Ensure There Is No Pressure In Chamber
- Drain Reservoir
- Turn Machine On Its Side
- Unscrew The Two Main Valve Caps On Bottom Of Valve
- Remove Springs And Button Retainers From Valve Block
- Replace Button Retainers If Scoring, Scratches Or Gouges Are Found On Teflon Seats. Replace If Necessary
PCR037.xxxx
- When Reassembling, Ensure O-Rings RPO355.xxxx Are Properly Seated In The Groves In The Main Valve Caps
Service Tip: Both The Vent & Fill Valves of The Main Valves Easily can easily be rebuilt with AllClaveParts Inexpensive
Main Valve Kits
Part #PCK026.xxxx
Main Valve Service Tips
- If Replacing The Button Retainers, Springs & O-Rings, The Main Valve Does Not Need To Be Removed From The Autoclave
- Check The Up & Down Travel Of The Main Valve Stem. If You Can Move The Main Valve Stem Up & Down With Your Fingers, The Valve Packing Needs To Be Replaced
- IF THE VALVE PACKINGS NEED TO BE REPLACED:
- Remove The Main Valve From The Autoclave
- Install The New Valve Packings One At A Time. If You Attempt To Install Both Packings At The Same Time,
The Bottom Packing Will Have A Tendency To Tilt To One Side & Prevent Proper Seating.
Install The First Packing & Keep It Square With The Valve Opening. Then Screw The Main Valve Nut In
Place To Seat The Packing. Remove The Main Valve Nut. Repeat The Process With The Remaining Packing
LINKS TO PARTS
"Pelton Crane OCM Autoclave Repair Made Simple™"