In order to troubleshoot and complete most repairs, you will need to remove the cover off of the machine to gain access to the interior components
How To Remove The Cover On The Statim 2000 Autoclave
Removing the cover on the Statim Autoclave is easy, once you follow these simple steps
Warning Unplug the Autoclave From the Outlet Before Proceeding
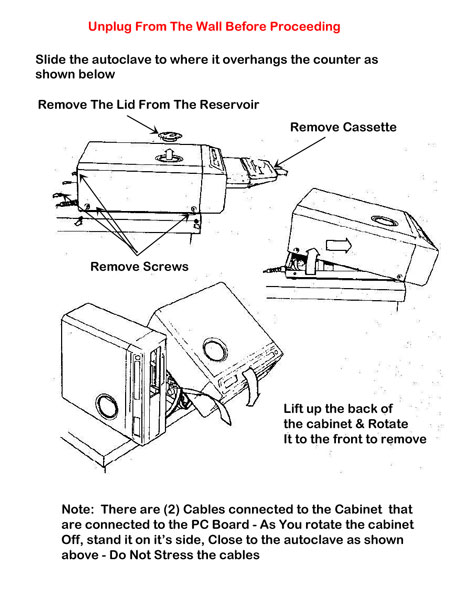
- Remove the Cassette from the Cassette Bay and set it aside
- Remove the Lid from the Water Reservoir and set it aside
- Remove the six crews holding the cover to the base of the autoclave (2 on each side and 2 from the rear)
- Slide The unit to where the control panel on the front of the autoclave is hanging off the counter as shown in the picture below
- Lift up on the rear of the cover and push it slightly forward
- Rotate the cover off while watching the 2 ribbon cables running from the front of the cover to the PC board - Be careful not to stress the connections - and to the side of the autoclave and stand it on it's side - close to the autoclave so the ribbon cables are not pulled tight

TIP: Statim 2000 Test Cable
Many troubleshooting procedures require you to run the machine with the cover off. With the cover laying on it's side, this can turn a simple process into a
complicated, and potentially dangerous, procedure.
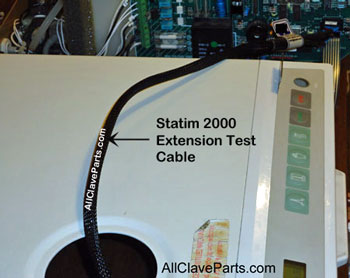
But, by using the Statim 2000 Extension Test Cable Part #SCT026-388, you can lay the
cover flat next to the autoclave, and operate it normally.

We always use the extension test cable, and those who have purchased it tell us it is the most useful tool they have!
Putting The cover Back On The Statim Autoclave
To put it all back together again, just follow the steps above in reverse order