When your Statim 2000 will not turn on
If nothing comes on when you turn it on.....and your Statim 2000 Autoclave seems to be lifeless, then this is where to start
It is important you determine which software version your Printed Circuit Board is using before proceeding.
Click Here to find out how
Now that you know the software revision you Statim 2000 autoclave has, you can follow the proceedures outlined below
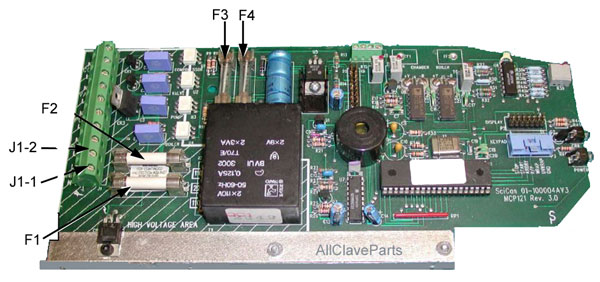
If you have Software Rev. 3.0 or 4.2 - Then These Instructions are for you

- Verify that the display does not come on and the green power light is not lit up
- Check outlet to make sure there is power to the outlet (check circuit breaker)
- Verify power switch is turned ON
- With power switch OFF check all fuses for continuity. If fuse(s) are not continuous, then the fuse(s) are bad and need to be replaced
- Turn main power switch ON
- Using a voltmeter check for line voltage at bottom two terminals on the left side of the PCB, J1-1 and J1-2. If line voltage is present proceed to step 7. If not check for burnt wiring from power cord to the power switch to the PCB
- Check For line voltage on the left side of the two 15 amp fuses. Place one meter lead on the left side of the upper fuse (F1) and one meter lead on the left side of the lower fuse (F2). If line voltage is present proceed to step 8. If not check the PCB for a bad connection between terminal J1-1 and the lower 15 amp fuse (F2) or terminal J1-2 and the upper 15 amp fuse (F1)
- Check for line voltage on the right side of the two 15 amp fuses. Place one meter lead on the right side of the upper fuse (F1) and one meter lead on the right side of the lower fuse (F2). If line voltage is present the Printed Circuit Board (PCB) is bad. If line voltage is not present recheck the 15 amp fuses or check for a bad connection at the fuse holders
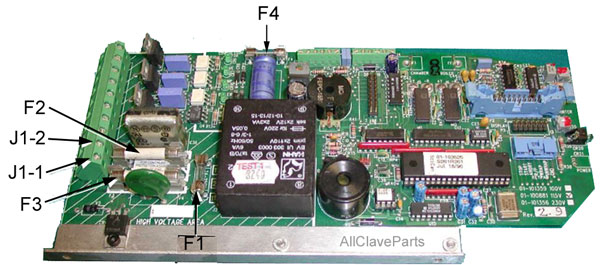
If you have Software Revision 2.4 thru 2.92 or 6.4, then these are the instructions for you

- Verify that there is nothing on the display and the green power light is not lit
- Check outlet to make sure there is power (check circuit breaker)
- Make sure the power cord is plugged into the electrical outlet and into the back of Statim
- Verify power switch is turned ON
- With power switch OFF, check all fuses for continuity. If they are not continuous, then the fuse(s) are bad and will need to be replaced
- Turn power switch ON
- Using a voltmeter check for line voltage at bottom two terminals on the left side of the PCB, J1-1 and J1-2. If line voltage is present proceed to step 8. If not check for burnt wiring from power cord to the power switch to the PCB
- Check for line voltage on the left side of the two 15 amp fuses. Place one meter lead on the left side of the upper fuse (F2) and one meter lead on the left side on the lower fuse (F3). If line voltage is present proceed to step 9. If not check the PCB for a bad connection between Terminal J1-1 and the lower 15 amp fuse (F3) or terminal J1-2 and the upper 15 amp fuse (F2)
- Check for line voltage on the right side of the two 15 amp fuses. Place one meter lead on the right side of the upper fuse (F2) and one meter lead on the right side of the lower fuse (F3). If line voltage is present the Printed Circuit Board (PCB) is bad. If line voltage is not present recheck 15 amp fuses or check for bad connection at fuse holders