How To Replace The Statim Water Pump
CAUTION: Pumps must be replaced with like pump. Do not use different style
pump. Pump must be primed before use
RECOMMENDED: Use The Field Service Smart Kit© (Part #SCK028) (including the
"Guide to Maintaining The SciCan STATIM© Sterile Processing System" &$45; available from
www.AllClaveParts.com to service the SciCan StatIM Cassette Autoclave

Water Pump Replacement
- Disconnect the power to the sterilizer. Remove the cover. Disconnect the (2) Ribbon Cables from the Display PC Board and Keypad From The Main PC Board
- Completely drain the Reservoir
- Remove Cable Ties securing pump wires and disconnect wires from Main PC Board
- Remove Metering Tube connection from Steam Generator/Boiler and disconnect the Silicone Tubing at the Drain Kit Barbed Tee or Reservoir, leaving the
Water Filter (In-Line) attached to Pump
- Remove (4) Mounting Screws from Rubber Mounting Brackets on existing Pump and remove Pump from Chassis

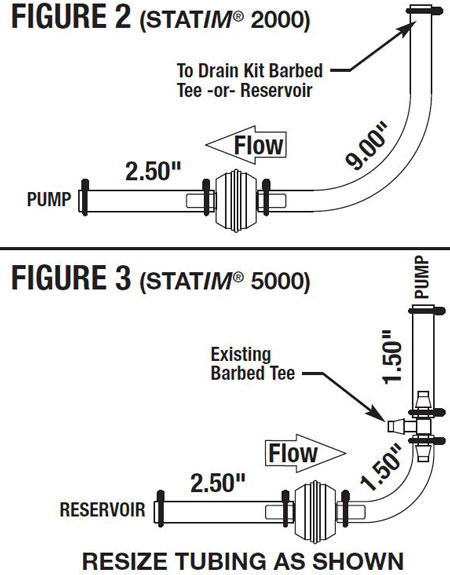
- Assemble Silicone Tubings (supplied in this kit) to Water Filter (In-Line)(Part #SCF034) as shown in Figure 2 (StatIM 2000) or Figure 3 (StatIM 5000).
Note direction of the Flow Arrow (if present) on Water Filter (In-Line). Secure barbed connections to Filter with Cable Ties supplied
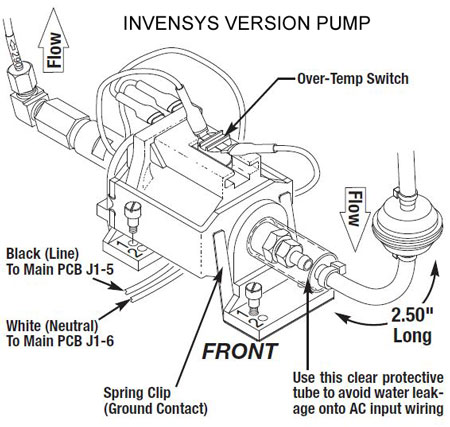
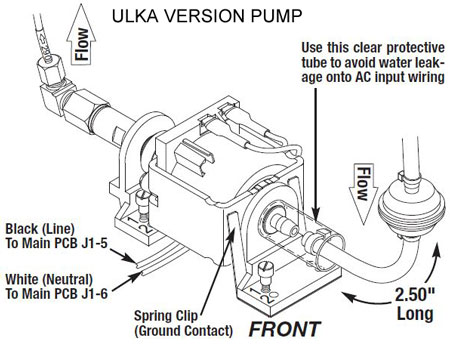
- Insert Spring Clip (supplied in this kit) behind Rubber Mounting Bracket on Input side of Pump (see Figure 4) and mount new Pump to Chassis
using (4) Shoulder Screws (supplied in this kit). Tighten Shoulder Screws until they bottom out
- Re-route wires and reconnect to Main PC Board (see Figure 4). Secure wires using Cable Ties
- Re-connect Metering Tube (Part #SCT053) (attached to new Pump) to Steam Generator/Boiler (DO NOT over-tighten)
- Attach the Silicone Tubing from the Water Filter (In-Line) to the Drain Kit Barbed Tee or Reservoir. Note Flow Arrow direction and tubing length
configuration (see Figure 2 or 3). Pass Silicone Tubing from other end of Water Filter through clear protective tube and install onto the input
port barb of the new Pump (see Figure 4). Install clear protective tube over fitting and secure connections with Cable Ties. CAUTION: ensure
the routing of tubing is located in an optimal location, and that there is no KINKING of tubing!
- Fill Reservoir with distilled water only
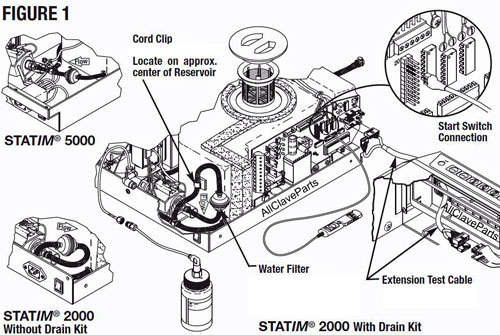
- Reconnect the (2) Ribbon Cables from the Display PC Board and Keypad (For ease of operation use an Extension Test Cable - Part #SCT026
- Restore power, prime Pump (using Start Switch - Part #SCS021 and Pump Tester Bottle Kit - Part #SCK024) (see Figure 1) and run test cycles.
- Re-install Cover. Sterilizer is now ready to return to service
Scican now recommends the use of the Reservior Cap & Filter Part #SCK059 (Coming Soon) along with the In-Line Water Filter on all units.
RECOMMENDED FIELD SERVICE SMART KIT© (PART #SCK028) TOOLS TO USE FOR PUMP INSTALLATION:
- Start Switch (Part #SCS021)
- Pump Tester Bottle Kit (Part #SCK024)
- Extension Test Cable (Part #SCT026)
INVENSYS VERSION PUMP

Main PC Board Software Rev 6.4 or older.
- Effective March 2006, all pumps were supplied with the spring clip (grounding)to improve water conductivity circuitry
- In early 2006, the Statim introduced the Reservoir Cap & Filter Part #SCK059 (Coming Soon)
- Effective June 2007, the Statim stopped using the mesh filter (installed inlet and outlet fittings) and offered the In-Line Water Filter
Part #SCF034 to be installed between the reservoir and pump
- The Statim now recommends the use of the Reservoir Cap & Filter Part #SCK059 (Coming Soon) along with the In-Line Water Filter on all units.
The mesh filters should be removed and the autoclave should be upgraded to the In-Line Water Filter (Drain Kit with Pump Filter Part #SCK037)
ULKA VERSION PUMP

Main PC Board Software Rev 7 and above.
ULKA Pump was introduced in conjunction with Software release 7 and was never supplied with Filter Mesh installed into inlet and outlet fittings.